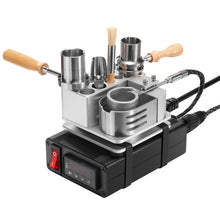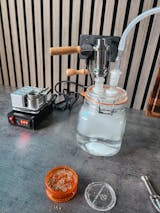
Wireless One Hit Wonder V2 - (SS WOHW V2/Ti WOHW V2) AKA WOHW V2
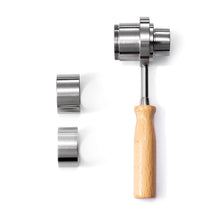
The WOHW V2 is an updated version of the WOHW, it has been updated to provide more heat retention, allowing for longer sessions before the housing needs to be re-heated in the coil/base and provides compatibility with bowls from other manufacturers such as the Cannabis Hardware and original Universal Baller diffuser bowls. It also makes use of ruby balls instead of gemstone cut rubies, this change has been made to allow for more airflow while also increasing the ruby chamber size to allow for better heat retention and the ability to take longer inhales.
Like the original WOHW this updated version is compatible with the included Matrix bowl (use the diffuser side of the housing), the Thermal Twist glass injector bowl (use the injector side) and the Microdose Diffuser Bowl (use the injector side, the microdose bowl sits inside that).
This setup takes around 5 minutes to heat from cold, then around 30-60 seconds to reheat in between sessions, depending on how long your inhale was, how fast you inhaled, the temperature you're running and if you take pauses between inhales. Most people will find they can get a full extraction from one heat cycle before needing to put it back on the stand to re-heat. (This is the most commonly asked question so I thought I'd pop the answer here!).
We also have the Ti WOHW V2, these have a slightly sharper flavour profile and slightly less smooth vapor due to the extra terps. If flavour is your priority go Titanium, if you like huge rips then SS will likely be a little smoother - both still have excellent flavour, these differences are nuanced.
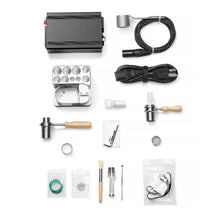
What's included in the full kit:
-
1x Stainless Steel (SS316) or Titanium (CP2) wireless housing filled with 490 pcs 2.5mm ruby ball
-
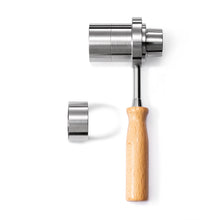
1x 21.15mm diffuser adapter preassembled (for use with included Matrix Bowl)
-
1 x 22.15mm diffuser adapter ring included (for use with 22mm diffuser bowls from elsewhere)
-
1x Titanium Matrix bowl with both 14.4mm and 18.8mm glass joints (14.4mm joint installed) (approx. 0.4g max capacity)
-
1x Classic PID controller
-
1x Dock Station with screws & Allen key
-
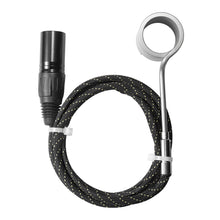
1x 25mm XL Barrel Heating Coil (220V)
-
1x SQP - Scoop and Tamper
-
1x Wooden Handle Brush
-
1x Power cord (UK 3-Pin Plug)
-
1x Adjustable height mesh basket style screen for Titanium Matrix bowl
-
2x Viton o-rings for Titanium Matrix bowl
- For 10% off our Chugga-Jug Bubbler when purchased with this kit, please use discount code "ChugChug" at checkout.
If we're out of stock of full kits, you're welcome to order the partial kit alongside the Classic PID Controller, this is the same controller as is used in the kit.
The full collection of compatible parts is here
Spare Glass adapters/joints for the bowls are available here
The new Micro Matrix Bowls are available here
A Quartz Banger setup designed for this setup is now available here
Please note that while this is a wireless housing setup, the controller still needs to be plugged into the mains!
Included in the Partial Kit:
- The same as above, just without the PID controller and power cable, so that you can use it with an existing PID controller
- Confirmed compatibility with Crossing, Cannabis Hardware, Auber, Disorderly Conduction (DC) and 710coils PID Controllers
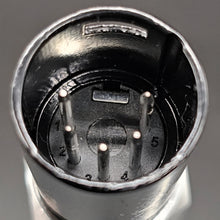
- Pin 1 is AC live line, pin 2 is AC zero line, pin 3 is temp positive, then 4 is temp negative and pin 5 is ground (please note the pin layout in the last photo, some older CH PID controllers are not compatible)
- If you do not have one of these PID controllers please purchase the full kit. Using the wrong Coil and PID combination can damage your kit and potentially yourself. Using incompatible setups will also void the warranty
What's included with the Housing Kit
- Just the housing and handle...
- With balls inside, the 21.15 adapter for Matrix Bowl installed and the 22.15mm bowl adapter included!
- If you want to use this with your original WOHW kit you'll need to grab the 25mm barrel coil linked here. We also have the Flexi Coil E-nails which are compatible if you're using it with a different PID controller and don't have a stand
Tips
- Check out the Portavb Universal Debowler, a great solution for emptying your bowl after vaping and storing the AVB.
- The RT Pro works really nicely with hash, if you double up the mesh screens then break up the material small but not too finely and place some on the top screen it's pretty effective. For bubble place a little vape cotton (like cotton bacon, we don't stock this) or hemp cotton in the bottom of the bowl then the hash on top... or pop a little herb in first and place it on that if you prefer! We recommend heat soaking the bowl first so that everything is nice and melty inside before you start the inhale. This cotton method can also be used for concentrates.
- The Adjustable Height Screen included can be moved higher up in the bowl when being used with the diffuser side of the housing. This allows for smaller loads to be easily measured into the bowl while retaining full airflow. The Microdose bowl (not included) is great for even smaller loads but will reduce the airflow a little due to the smaller diameter.
How to set up SS WOHW:
Step 1. Plug in the heating coil into the round plug at the rear of the unit. Plug in the power cord into the rear of the unit. *Make sure both the power cord and the heating coil are securely connected.*
Step 2. Wrap the heating coil cord carefully around the cable management lugs of the docking station. Place the other end of the heating coil into the top slot of the dock station and fix with the two screws provided, using the Allen key. Tighten so the heating coil is snug and secure.
Setting temperature (after the burn off):
To set the temperature ONLY use the up and down arrows, you do not need to press the set button to do this. *The suggested vape temperature range for vaporization is 510-560 Fahrenheit.*
Burn off the manufacturing oil: DO ONCE BEFORE FIRST USE ONLY!
Before the first use, put the wireless housing into the heating coil and heat to 600f for 15-20 minutes. This is to burn off any residue from manufacturing. You are only required to do this once. After this is done reduce the temperature to within the vaping range and allow it a few minutes to settle.
Don't heat soak the bowl while you're doing the burn off! If you want to clean that before use just use a little ISO to wipe it out or give it a quick soak, then let it dry as you would normally clean it.
How to use:
For a convection (hot air) hit, load desired flower to the Matrix titanium bowl using the provided scoop. Use the base of the spoon to pack it down gently for even heat distribution. Around one slightly heaped scoop is the maximum amount we suggest using.
*Don't pack too tightly or you will restrict airflow.*
Once the wireless housing is placed in the heating coil, allow time for the wireless housing to heat soak, this can take around 5-10 minutes (from cold) depending on your preference. In between inhales you only need to leave it for around a minute if it hasn't been left to cool for long.
For a hybrid (hot air and hot surface) hit, you can place the Matrix bowl upside down on the injector side of the WOHW housing as it heats in the coil. The same can be done with the Microdose Diffuser bowl (not included). This will allow it to heat soak the bowl. When you’re ready remove the bowl holding it by the wooden handle (or side joint for the microdose bowl), place it onto your bubbler and load the herb in. Then place the heater housing on the bowl, diffuser side down and inhale! This will result in faster vapor production and slightly heavier effects from your herb.
After the housing has heat soaked:
Once ready, place the wireless housing inside your Matrix titanium bowl with original adapter and begin your inhale. You can clear the entire bowl with a single pull, or do it in 2-3 based on your draw and temp. The housing can retain heat during a shorter session, even with short pauses between hits, the warmth stays steady, no re-heating needed. This is especially true if you have also heat soaked the bowl as above.
Repeat as desired. When the session is finished, empty the bowl and use the wood brush to clean the screen. Please note that the longer your session is, the longer you will need to re-heat the housing in the coil after use. With this in mind if you plan to load another bowl straight after, you may want to place the housing back into the coil after each inhale to ensure that it remains at a higher temperature and is ready to go again straight after your first bowl!
You can use the 21.15mm diffuser adapter which is pre-assembled and designed to fit the provided Matrix bowl. You can also flip over and use the wireless housing to use as an injector onto the matrix titanium bowl as per your preference. The housing is also compatible with the Thermal/Ruby Twist Glass Bowl (injector side) and Thermal/Ruby Twist Microdose Diffuser Bowls (injector side).
The WOHW V2 has been designed to not only work with the Crossing bowls listed above, but also with other diffuser bowls such as the Cannabis Hardware and Universal Baller ones. This allows for a wider selection of options and the ability to use existing bowls (if you have them!) with the setup. To do this (when the housing is cold) unscrew the 21.15mm diffuser ring on the bottom of the housing and replace it with the 22.15mm ring included.
The dock station has 3 slots for 18mm joints, 4 slots for 14mm joints and 2 slots for 10mm joints to stock with bangers, bowls, or accessories.
The Titanium bowl comes with 14.4mm glass joint (pre-installed) and 18.8mm glass joint included with the kit. You can switch the glass joints to fit your glass as desired.
Note: The glass joints on the Titanium Matrix bowls can be quite stiff to remove. We've found the best way is to grip the glass joint and bowl firmly then pull steadily apart, don't wiggle or twist. Once it's apart you can add a little o-ring lubricant to the o-rings to make it easier the next time. If you're really having trouble, you can use thermal expansion to assist; place your wireless housing onto the bowl for around 15 seconds to heat it up, then hold the titanium part with an oven glove or towel and pull the glass joint out as described here.
Warnings:
- Do not touch the heater coil unless it has fully cooled
- Do not touch the metal of the housing, only the wooden handle
- Do not touch the metal of the bowl until it has cooled, especially if it has been heat soaked
- Do not leave mains powered setups unattended and keep them away from pets and children
- Keep away from water and high humidity
Disclaimer:
Crossing Tech and its retailers are not responsible for the use or misuse of this product. The WOHW is intended for use with legal materials only.
If any parts are damaged please cease use and contact your retailer.
Don't leave mains powered setups unattended and ensure they're kept in good working condition. Keep away from water, pets and children! The heater gets hot!
Warranty:
The Heater Coil and PID Controller come with a one year manufacturer warranty against defects. Please contact your retailer to place a warranty claim. Please report any glass breakages on arrival.
(we helped write the manual for this, so when you open it up and check the instructions, it'll all seem very familiar!)


